Piggy Bow Variation

Here is a fun variation on the piggy bow with a knot in the middle.  Swap out the knot for a button.  At craft stores you can get these cute novelty buttons.  I love how it takes a plain bow and makes it coordinate with an outfit even more or just go with the current season.  Happy bow making to ya!

Posted in Uncategorized | Tagged | 3 Comments

Piggy Bow Tutorial

After I had Macey the girls in the ward (neighborhood) got together and had a bow party.  I didn’t know how to make bows so it was fun to have someone show me how.  After that I went out and bought tons of ribbon and made a bow to match every one of Maceys outfits.  So here is how I learned how to do bows.  I’m sure there are lots of other ways, but this is one way I do it.
First your going to need 7/8ths width ribbon and 3/8ths width ribbon, a needle and thread, hot glue gun and a clippy to glue the bow on to.
Cut your ribbon at an angle and seal your edge with a candle or Fraycheck.  Then pinch your ribbon into thirds about two inches from the end.
Bring your ribbon around to make a loop and pinch it into thirds again.  Pinching into thirds gives the bow some oomph and makes it poofyish.
Make a loop on the other side and pinch again.  Do this until you have two loops on each side.
Once you’ve got your double looped bow your going to take the center where all your ribbon is pinched together and stick a needle and thread through it.  Be sure and double or tripple knot the end of your thread!  Pull your thread all the way through and then wrap the remaining thread around the center really tight.
So it looks like this.
Take your 3/8ths inch width ribbon and tie a knot in it and pull it tight.
Put the knot over the midde where the thread is and hot glue the knotted ribbon on the backside to the bow.
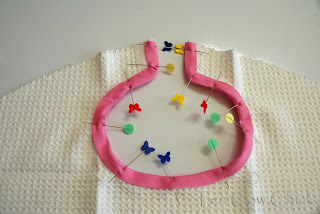
Now we are going to line the hair clip with ribbon (you can get these at Sally Beauty supply.)  Put a dot of hot glue on the backside and put your 3/8ths width ribbon on it.
Flip the clip over and put another dot of glue on the front side and pull your ribbon around the back and to the front.
This ones tricky.  Put a dot of glue on the inside of the clip and pull your ribbon around an inside.  Now that you’ve got your clip lined with ribbon and there’s no ugly metal visible stick a big dob of hot glue on top of the clip an glue your bow down to it.
And your finished! Except your going to want to cut your ends so they are the matching length. Maybe it’s just the funny angle of the camera that makes one look longer than the other. 
Rinse and repeat as desired.
{Thanks for the awesome dishes Virginia!}
Macey looks soo cute with piggy bows in her hair.
Posted in Uncategorized | Tagged , , | 11 Comments

The Best Baby Wrap

Alright all you baby mama’s, you have got to check this out! This is the most comfortable, most inexpensive baby wrap you will ever see! I just made this yesterday and have used it soo much already, I can do laundy and dishes with it on because I can bend way over and the baby doesn’t budge.  Can you tell I’m excited about it? I have a store bought Mei Tei type sling but my back aches soo much by the end of the day, plus Maddy gets scrunched down in it after awhile.  To make this all you need is 5 yards of fabric by 30 inches.  You’ll want a fabric with a little bit of stretch to it. I used an old jersey knit bed sheet that I had on hand. I’m not super picky about color because you can’t beat free-ninety-nine (those are clouds on the sheets, not clorox spots, just to clarify).
 
Step number one (after you get your fabric cut and sewn together). Take the middle of the fabric and hold it at your waist.
Take the tails and throw them up around your back criss-crossed. Does that make sense? You’ll want to pull it a little tighter in the next step.
Then you take the tails over your shoulder and . .  (Please excuse my mini-assistant, she wants to demonstrate as well.)
Tuck the tails under the strip of fabric that is around your waist.
Now your going to take the tails and cross them and then . .
Tie a double knot around your back.
Pick up your little schmootzy-poo and put her legs in the straps that went over your shoulders.
Now your going to take the fabric that was around your waist and pull it up over the baby as far up as you want to go.
And there you have it, the best baby wrap ever!
Posted in Uncategorized | Tagged , | 3 Comments

Korker Bows

Whenever I have korker bows in Maceys’ hair people always ask if I made them.  And then when I say I did they have this shocked look on their face.  It’s not hard people.  So I’m going to share with you all how to make korker bows.  

First you wrap grosgrain ribbon around wood dowels.  If you have wide ribbon you want a wider dowel, smaller ribbon a smaller width dowel.  Then your going to clamp the ends with a clothespin. Put it in the oven at 275 degrees for 25 minutes.  If I’m just doing one bow it usually fits in the toaster oven.  
Then you take your hair clippy and use hot glue to line it with ribbon.  I get mine at Sally Beauty Supply. 
Then when your ribbon is done baking you line up the ribbon and cut it down to size.  I did mine at about 2.25 inches.
Line up your little bundles of ribbon with elastic underneath and then tie the elastic tight around the ribbon.
Then you hot glue your little corker ribbon bundles onto your hair clippies. Touch up the ends with Fray Check so they don’t fray out on you (duh, I know).  And there you have some cute piggy tail bows!
Posted in Uncategorized | Tagged , , | 15 Comments

Organza Flowers

I saw a tutorial for organza flowers on Little Birdie Secrets and decided I had to make some.  I mean, what if my baby is born bald? She’ll need something cute on her head so people don’t think she’s a boy, right?  So, I ordered the variety pack of nylon headbands off of this website. 
Oooh it’s soo pretty I just want to sit and stare at it.  Keep in mind organza is totally different than tulle.  It’s a much finer fabric.  You can find it in the bridal/prom section of the fabric store.  I couldn’t decide how much to buy, so I bought a fourth of a yard of each.  Umm, ya, that’s a bit much. I probably should have only bought an eighth of a yard.  But, she who dies with the most fabric wins.
So then you cut out your circles or petals, either way turns out cute.  Sorry for the dark picture.  I can only light candles after Macey goes to bed.  Otherwise I am forced to sing “Happy Birthday to You” a million times and blow out the candle.  I have to admit I was kinda skeptical that the edges would curl under all cute.  But once you put the edge close to the flame it curls up.  The first time I did this I actually said out loud “Oooh pretty.”
The more layers you do the cuter it gets.  You want the smallest layer to be about the size of a quarter, and then do each layer after that about a fourth of an inch bigger in diameter.  Once you get all the layers done (in this picture it’s only half ways done) you sew the layers together with a nylon thread and then sew beads in the center. Glue it to a clippy or sew it onto your headband and there ya go, one stylin’ baby headband!
Posted in Uncategorized | Tagged , | Leave a comment

Toddler Dish Towel Bib

This bibb pattern is one that I came up with out of sheer necessity.  I don’t know what other people do once their kids grow out of the baby size bibbs. Stores don’t seem to have much (okay, they don’t have anything that I can find) in the way of cloth toddler size bibbs.  My two-year-old needs something to cover her whole front and the more coverage the better. 
This is my first sewing tutorial so if you have any questions be sure to let me know!
To start off your going to need:


-Dish Towels (new or used) most towels are 16 inches across which is what my pattern fits.
-Velcro
-Binding – Extra Wide Double Fold Bias tape seems to work the best
-Fusible Fabric if you want to add an applique and make it all fancy.
-Print out the pattern here {for personal use only}


First your going to print out the pattern and cut it out.  Fold your towel in half hot-dog style (I learned that in Primary 🙂 that means long ways.
Cut your fabric along the pattern.
This next step is the trickiest in the whole thing so pay close attention.  Your going to cut a strip of velcro about two inches long.  Pin the hook side of the velcro to the top of the towel.  Pin the eye side of the velcro to the BACK side of the other tab. If you sew them both to the top it won’t velcro together right. Your going to want to leave about a fourth of a inch space between the edge and the velcro, especially if you have the extra wide binding. Then sew the velcro on.
Next your going to pin the binding to the neck part of the bibb.  Then zig-zag stich it on.
Now your going to fold the end of the binding tape in about a fourth of an inch so you don’t have a raw edge sticking out.
Then pin the binding along the top of the bibb.  Be sure to turn your edges under at the ends when you pin it.  It will give it a more finished look.  Once you sew this binding on your done if you want to be.  Or you can sew some ribbon, ric-rack, buttons or an applique onto the bibb to fancy it up.
Don’t throw away that extra strip of towel from the top.  Square it up and cut it.  Fold the raw edge under a fourth of an inch and zig-zag it. Now you have a new cleaning rag AND a cute bibb. 
Posted in Uncategorized | Tagged , , | 12 Comments

Mini Bow Tutorial

 I can’t do bows the traditional way where you just do the rabbit ears thing and tie it.  Mine always turn out skiddywampus.  Some people can do it, and if you can, then good for you.  For those of us who can’t, here’s a tutorial on how to make them another way and have them turn out cute. Your going to need:

-Ribbon
-Thread and Needle
-Print out the template on cardstock template pattern here
-Hot glue gun
There are two different sizes of patterns, a big one and a small one.  This is the big pattern that I use on the thicker ribbon.  First you cut your ribbon to 5.5 inches.  If your using the small pattern and skinny ribbon you will cut it to 4.5 inches. You put your ribbon behind the pattern as shown.
Then you wrap the ends around the front.
Using a hair clippy you secure the ribbon down while you get your needle and thread ready.
Then you stick the needle through all three layers of ribbon and wrap the thread around the middle.  Make a knot in the back and tie it off and cut it.
Then cut a small piece of coordinating ribbon, or use the same ribbon if you want.
Put a little dab of hot glue on the backside of the bow and wrap the little piece of ribbon around it and hold it until the glue cools down.  Then cut the excess ribbon off. Trim up your ends so the match evenly on both sides and then seal the ends of the ribbon.
And your all finished!
I also bought some do-dads that were on sale at Joann’s to make into mini hair clippies just in case the baby has a small amount of hair I can put a clip in. You can buy the little barrette clips at Wal-Mart.
First you line your clip with ribbon. Put a dab of hot glue in the middle and then put your little do-dad on top of it and there ya go.
Cute little clippies.  I think this is the shortest tutorial there is.
And now I put it all in a little organza bag and throw in the hospital bag, which is still not packed yet.  I guess I better get off the computer and get that done. Happy bow making to ya!
Posted in Uncategorized | Tagged , , | 3 Comments

Registration and Insurance Card Organizer Tutorial

The other day Justin noticed that the auto insurance card was not in the jockey box (or glove compartment, whatever ya want to call it.)  I know I put it in there, but my guess is that it got thrown out with the In-N-Out napkins.  So I had the insurance guy print up some new ones and came up with a solution to make sure it doesn’t get misplaced again.  I made these little auto info organizers for the vehicles.  So, if ya like my idea and want to make some for your vehicles, here’s how I made them.
Your going to need:
– (2) 9.5 inches squares of fabric
-(1) 9.5 inch square of heavy fusible fabric
– Extra wide double fold bias tape
– 4 x 9.5 inches of clear vinyl (you get this on those big rolls by the tablecloths you can buy by the yard)
First you take you piece of vinyl and sew a strip of binding tape along the top.  You don’t need to fold the ends under because it will be hidden at the end.
Iron your fusible fabric to the backside of one of your fabric squares.
Now your going to put your layers together.  First put your piece of fabric with that you just ironed right side down, then your other piece of fabric right side up on top of that.  Then take your vinyl pocket strip and put that along the bottom.
Sew right down the center. 
Put your binding around the edges, and your done! Rinse and repeat for as many vehicles as you have. It’s super easy to make and could save ya a ton of stress if you were to ever get pulled over (heaven forbid!).
Posted in Uncategorized | Tagged , | 2 Comments

I Have a Dot Com!

Welcome to my new blog!  My brainiac little sister made this awesome blog for me.  Thank you Kirby Lue-who!

Posted in Uncategorized | Leave a comment